Make your Own Realistic Sketch Art with AI
An in-depth guide for artists, beginners, and tech enthusiasts
Table of Contents
-
Introduction
-
What is AI-Powered Sketch Art?
-
Why Use AI for Realistic Sketching? Benefits & Limitations
-
Tools & Platforms to Start With
-
How to Plan Your Sketch Art: From Idea to Prompt
-
Techniques & Tips to Make Sketches Look Realistic
-
Workflow Examples: Step-by-Step Process
-
Common Mistakes & How to Avoid Them
-
Ethics, Copyright & Responsible Use
-
Advanced Tricks & Next Steps
-
FAQs
-
Conclusion + Call to Action
1. Introduction
Sketch art has long been a favored style among artists looking to capture emotion, form, texture, and light with simplicity. Whether you’re sketching portraits, landscapes, still life, or fanciful designs, the raw elegance of pencil lines, shading, cross-hatching, and tonal contrast never fails to captivate.
But what if you could augment these skills with the power of artificial intelligence? To take a basic sketch (or even just an idea) and transform it into a hyper-realistic work of art—preserving the spontaneous feel of sketching while enhancing detail, texture, lighting, depth, and realism? That’s what AI sketch art promises.
This guide walks you through how to make your own realistic sketch art using AI. After reading this, you’ll know:
-
What tools are available
-
How to plan and write prompts that guide AI well
-
How to refine results to make them look genuinely realistic
-
Ethical considerations so you don’t misuse technology
Let’s begin.
2. What is AI-Powered Sketch Art?
AI-powered sketch art refers to using machine learning models (especially generative models) to assist in creating or enhancing sketch-style artwork. This might include:
-
Sketch-to-image conversion: you start with a hand-drawn or digital sketch, upload it, use AI to add realistic textures, lighting, color, shading, etc.
-
Text-to-sketch or prompt-based generation: you write a text prompt (“an elderly man with deep wrinkles, intense lighting, charcoal style, dramatic shadows”) and the AI produces a sketch or realistic drawing.
-
Photo-to-sketch or image refinement: converting photos into pencil-sketches or enhancing rough sketches with realism.
Modern tools use techniques like diffusion models, neural networks, image synthesis, often combining edge detection, style transfer, and reference training data to interpret lines, shadows, color, depth, etc.
3. Why Use AI for Realistic Sketching? Benefits & Limitations
Benefits
-
Speed and efficiency: what might take many hours manually can be done in minutes using AI.
-
Idea exploration: you can try multiple styles, lighting conditions, compositions without starting over from scratch.
-
Accessibility: even if your drawing skills are still developing, you can produce impressive results by combining your sketches with AI.
-
Learning tool: you can study how AI handles light, texture, anatomy, etc., then apply those lessons to your own manual work.
-
Scalability: for projects like concept art, illustrations, portfolios, social media content—AI can help you produce a higher volume or polish.
Limitations
-
Lack of uniqueness: If many people use the same AI models and similar prompts, art may start to look derivative.
-
Control issues: AI may misinterpret your intention (proportions, mood, lighting) and produce artifacts or unwanted variations.
-
Detail fidelity: small details—hands, hair, fabric folds—can still be challenging for some models to get exactly right.
-
Ethical / legal concerns: about ownership, copyright, style imitation, AI data training, etc.
Knowing both sides helps you use AI wisely.
4. Tools & Platforms to Start With
Here are several tools and platforms (free & paid) that are particularly good for creating realistic sketch art with AI:
| Tool / Platform | What It Offers | Pros | Considerations |
|---|---|---|---|
| Fotor | Sketch-to-image converter, photo to sketch, sketch style variations. Fotor | Easy UI, multiple styles, works online & on mobile. Fotor | Sometimes limited in refining fine details. |
| getimg.ai | Text or image to drawing; various drawing styles, including realistic pencil or charcoal. getimg.ai | Powerful style options; good for realistic textures. getimg.ai | Paid tiers for higher resolution or advanced options. |
| ImagineArt | Real-time sketch generator, convert scribbles into refined art. Imagine Art | Fast iteration; easy experimentation. Imagine Art | May need tweaking to get photorealistic shadows and lighting. |
| insMind | Text prompt + optional image upload; creates pencil-style/sketch art from descriptions/photos. insMind | Flexible input; good for brainstorming and concept art. insMind | Output sometimes needs manual touch-ups. |
| Modelia.ai / Xole.ai | Sketch-to-image generators that interpret user sketches, add color, texture, etc. modelia.ai+1 | Great when you already have a sketch; helps with coloring & depth. | Might not always preserve exact style or your intended mood. |
5. How to Plan Your Sketch Art: From Idea to Prompt
To get fantastic AI results, planning is key. Here’s how you can prepare:
-
Define your subject & mood
-
What do you want to draw? Portrait of a person, animal, building, scene, fantasy, etc.
-
What mood? Dramatic, soft, moody, bright, vintage, etc.
-
-
Gather reference images
-
Photos or drawings that show lighting, anatomy, material textures (hair, skin, fabric) similar to what you want.
-
If possible, multiple angles, lighting conditions.
-
-
Decide your style / sketch type
-
Pencil, charcoal, ink, graphite, cross-hatching, line art, etc.
-
Realistic, semi-realistic, stylized.
-
-
Think about composition & lighting
-
Where’s the light source? What kind of contrast do you want (high contrast, soft shadows)?
-
What’s the angle / viewpoint? Full body, close‐up, profile?
-
-
Write a precise prompt
Include:-
Subject (What)
-
Style (Sketch type)
-
Lighting & texture
-
Mood & atmosphere
-
Any constraints (“keep hands realistic,” “preserve original sketch lines,” “high-detail”)
-
-
Decide on output details
-
What resolution or size?
-
Color or black & white?
-
Format (PNG, JPG, etc.)
-
6. Techniques & Tips to Make Sketches Look Realistic
Here are practical tips to help your sketch art look more realistic when produced or enhanced by AI:
-
High-quality base sketch
If you begin with a sketch (digitally or scan a pencil drawing), ensure it has clear, clean lines, good contrast. Smudges or unclear lines make it harder for AI to interpret structure. -
Use multiple prompts / prompt engineering
Try variants:-
One prompt emphasizing lighting (“dramatic shadow from top left, soft fill light”)
-
Another emphasizing texture (“skin pores, fine hair strokes, fabric weave”)
-
Another emphasizing style (“charcoal, graphite, hyper realistic portrait”)
-
-
ControlNet or edge/line constraints (if available)
Some platforms let you supply edge maps or line drawings that constrain how AI fills in the rest. This helps maintain your original composition. -
Refine in iterations
First pass: get the overall shape, lighting, mood.
Subsequent passes: zoom into details (eyes, hair, cloth, etc.), refine shading, add texture. -
Attention to light & shadow
Realism often depends on believable lighting. Use reference photos to see how shadows fall, how highlights reflect. Guide your AI with prompts like “strong rim lighting,” “soft diffused light,” etc. -
Textures & materials
Different surfaces reflect light differently: skin, metal, wood, fabric, glass. Describing those helps (“rough skin texture,” “silky fabric highlights,” etc.). -
Post-processing
Use tools like Photoshop, Krita, Procreate, GIMP, etc., to clean up artifacts, sharpen edges, adjust contrast, fix anatomy or perspective if needed. -
Layering effects
In digital tools, build up detail gradually—sketch, mid-tones, shadows, highlights. Even in AI output, you can often layer texture afterwards.
7. Workflow Examples: Step-by-Step Process
Here are two sample workflows: one for beginners, one more advanced.
Beginner Workflow
-
Sketch or Scribble
-
On paper or digitally, draw the basic outline. Keep it simple.
-
-
Scan or Photograph / Import
-
Upload the sketch to your AI tool (Modelia, insMind, Fotor, etc.).
-
-
Write the Prompt
Example: “Convert this pencil sketch of a girl’s face into a realistic portrait with soft lighting, detailed skin texture, natural eyes, graphite pencil style, high contrast.” -
Generate & Review
-
See several variations, pick best.
-
-
Refine
-
If details are off (e.g., eyes look unnatural), prompt again: “more realistic eyes and eyelashes, sharper detail, softer shading around nose.”
-
-
Post-process
-
Use image editor to clean edges, adjust contrast or brightness, maybe sharpen key areas like eyes.
-
-
Finalize & Export
-
High resolution, appropriate format for print or web.
-
Advanced Workflow
-
Concept & Mood Board
-
Collect photos for lighting, texture, color palette, mood.
-
-
Pre-sketch with constraints
-
Digitally sketch with clear lines and edge maps. Possibly define line weight, perspective grid.
-
-
Use Tool with Edge/Line Control
-
Use a platform that supports line constraints or control nets so AI respects your base structure.
-
-
Multi-prompt method
-
Run several prompts focusing individually on texture, lighting, anatomy; then combine outputs via blending or selecting parts.
-
-
Detail pass
-
Fix small issues: make sure the hands look correct, facial symmetry, realistic proportions.
-
-
Add realistic touches
-
Subtle reflections, tiny imperfections, hair flyaways, skin pores, ambient occlusion (shadow where two surfaces meet) etc.
-
-
Color or selective coloring (if desired)
-
Even if final is sketch style, you might selectively add color to certain elements (eyes, background) for effect.
-
-
Final polish & output
8. Common Mistakes & How to Avoid Them
| Mistake | Why It Happens | How to Fix / Avoid |
|---|---|---|
| Over-reliance on default prompts | They are generic but might lead to bland or unnatural results | Customize prompts; use references; iterate. |
| Ignoring anatomy / proportion issues | AI sometimes misinterprets hands, limbs, facial proportions | Use reference, annotate: “accurate anatomy,” “correct perspective.” |
| Flat lighting | Without direction, lighting may be generic and reduce depth | Specify light direction, contrast, shadows. |
| Lack of texture | AI can smooth too much, losing texture detail | Include “skin pores,” “hair strands,” “fabric weave” etc in prompts. |
| Artifacts and weird distortions | Complex scenes strain AI; some areas (hands, ears, background) get garbled | Examine results carefully; edit with post tools; possibly mask problematic parts. |
| Over-polishing / loss of sketch feel | Trying to add too much detail can kill the raw sketch charm | Decide what style you want: pure sketch vs sketch with realism; maintain some sketch elements. |
9. Ethics, Copyright & Responsible Use
When creating AI artwork, especially realistic one inspired by or similar to existing styles, there are ethical and legal issues to keep in mind:
-
Training Data Concerns: AI models are often trained on massive image datasets, some of which include copyrighted work. Be aware that imitating a specific artist’s style too closely may infringe on rights or lead to plagiarism claims.
-
Attribution & Transparency: If you sell or publish your AI-assisted art, consider indicating that AI was used. Some communities value transparency.
-
Commercial Use Licenses: Make sure the AI tool you’re using allows commercial use if you intend to sell or monetize the art. Some free versions restrict usage.
-
Misinformation & Misleading Claims: Avoid passing off AI’s work as your wholly manual art if that matters ethically.
-
Respect for Subjects / Cultural Sensitivity: When using references of people or cultural elements, ensure you are not misappropriating or violating rights or sensitivities.
10. Advanced Tricks & Next Steps
Once you’ve mastered basic realistic sketch art with AI, here are ways to push boundaries:
-
Combine multiple generated outputs: Blend aspects you like from different AI versions to create a hybrid image.
-
Use AI models with custom styles: Train or finetune models (if possible) with your own sketches or reference materials so the AI better matches your style.
-
3D sketching, depth & perspective tools: Use perspective grids, vanishing points, light simulation to improve realism.
-
Animation or motion: Animate small details—hair swaying, light flickering, clouds—to bring sketches to life.
-
Mixed Media: Combine AI sketch + hand-refinement + actual paint / digital painting for unique textures.
-
Print & Physical Display: Optimize for color calibration, resolution, printing mediums to make your art shine in real life.
11. FAQs
Q1: Do I need to be good at drawing to make good AI sketch art?
A: No, but understanding basic concepts—anatomy, perspective, lighting—helps a lot. Even simple sketches can become stunning if the prompt and refinement are handled well.
Q2: What kind of prompts work best for realistic sketch art?
A: Prompts that include subject, style, lighting, texture, mood. For example: “A realistic portrait of an elderly woman, graphite pencil sketch, high-contrast lighting from side, detailed wrinkles, deep shadows, sharp eyes, soft background blur.”
Q3: Which tool should I start with if I’m a beginner?
A: Try something with a gentle learning curve and free tiers: Fotor, insMind, ImagineArt. These allow sketches and give instant feedback. As you grow, move to tools that permit more control (edge maps, high resolution, prompt tweaking).
Q4: How can I get AI to respect my original sketch more (so it doesn’t change what I drew)?
A: Use tools with control-net or line/edge constraint features. Be explicit in your prompt: “preserve original sketch lines,” “keep proportions as drawn,” etc. Use high contrast in your base sketch so AI can pick up the lines.
Q5: Is black & white sketch or color better?
A: Depends on your aesthetic. Black & white sketches often emphasize form, contrast, light & shadow. Color adds mood, vibrancy, realism. You can also do selective color (only certain elements) for effect.
Q6: How do I handle small details like hands, eyes, hair?
A: Focus refinement on those areas. Use close-ups. Specify in prompt: “fine hair strands,” “realistic eyes with reflections,” “accurate hand anatomy.” It may take more iterations. Sometimes do manual touch-ups.
Q7: What resolution should I use if I want to print the work?
A: Aim for high resolution (300 DPI or equivalent), large dimensions. Tools sometimes limit output; if so, upscale with dedicated upscaler tools. Always test print a small part first if possible.
Q8: What are some realistic sketch styles I can try?
A: Graphite pencil, charcoal, ink wash, cross-hatching, stippling, ball-point pen, soft pastel pencil, mixed style (sketch + partial coloration) etc. Each has its own look and texture.
Q9: Can I monetize AI sketch art?
A: Yes, but check the license of the tool. Also consider ethical factors (how much AI vs your own input), originality, and whether your audience cares. Many sell prints, digital assets, NFTs, etc.
Q10: How to maintain originality (not having work that looks just like AI default style)?
A: Develop your own style by iterating, blending AI output with your own manual work. Use your own reference photos, unique prompts, color palettes. Avoid copying overused prompt phrases.
Prompt:
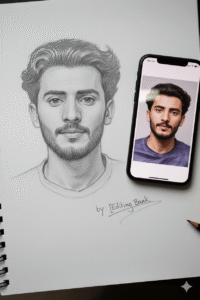
Use 100% same face structure of my uploaded image. Create an ultra-detailed, hyper-realistic 3D-style graphite pencil sketch of a human face, drawn on textured white notebook paper with visible paper grain and subtle imperfections. The face sketch should look exactly like the reference photo shown on an iPhone placed next to the notebook.The iPhone’s screen clearly displays the original portrait photo that the artist is drawing, with natural reflections and soft daylight glare on the glass. Signature sketch connected with potlot written “by: [Editing Bank]” with art scratch.
Generate
12. Conclusion + Call to Action
AI-powered sketch art opens up a powerful space for creativity: it lets you combine your artistic vision with computational power, explore ideas quickly, refine style, and push realism in new directions. It doesn’t replace your skill—it enhances it.
If you’re eager to try:
-
Pick one simple project: maybe a portrait or a still life.
-
Sketch it (even roughly).
-
Use one AI tool to convert or enhance it.
-
Refine, experiment, iterate.
I challenge you: create at least one realistic sketch art with AI this week. Post it somewhere (social media or art communities), reflect on what you liked & what you’d change. Share your before & after.