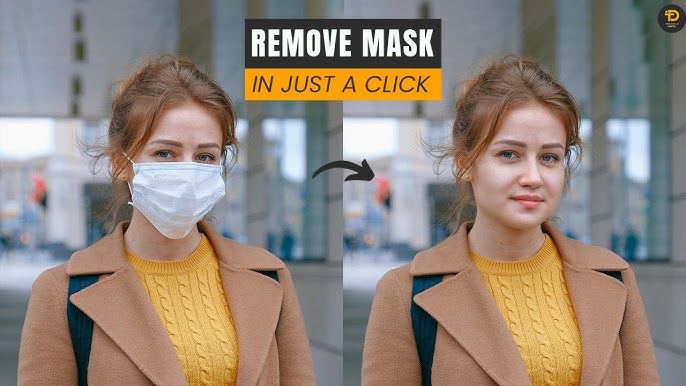
How to Remove a Face Mask from a Photo Using AI: A Comprehensive Guide
In today’s digital world, photo manipulation has become a common practice for both amateur photographers and professional image editors alike. With the rise of artificial intelligence (AI) tools and software, even complex tasks such as removing face masks from photos have become more accessible than ever before. Whether you’re working with pictures from the pandemic era, or simply need to enhance an image, understanding how to remove face masks from photos using AI can be a useful skill. In this comprehensive guide, we’ll explore various techniques, tools, and tips to effectively remove face masks from photos using AI.
Why Do People Remove Face Masks from Photos?
Before diving into the process, it’s essential to understand why someone might want to remove a face mask from an image. Several reasons can contribute to this desire:
- Personal Preference: Many people are accustomed to seeing others’ faces without the obstruction of a mask, especially in personal photos.
- Professional or Social Media Use: When posting pictures on platforms like Instagram, LinkedIn, or Facebook, people often prefer to showcase their faces clearly.
- Creative Projects: Artists, photographers, and designers may need a mask-free image for creative reasons or to enhance the subject’s expression in a portrait.
- Marketing and Branding: Businesses or influencers might need clean, mask-free images for advertisements or social media campaigns, where facial expressions play a crucial role in brand representation.
- Restoration of Pre-Pandemic Images: With the decline in mask-wearing, some might want to revert photos taken during the pandemic to their pre-pandemic appearance for aesthetic or historical reasons.
Whatever the reason, the process of removing face masks is relatively straightforward with the help of AI-powered tools.
The Science Behind AI Photo Editing
AI image editing tools use advanced machine learning algorithms to understand the components of an image. These tools typically analyze patterns, recognize objects, and predict what elements should appear behind or underneath a mask based on surrounding data. Most AI image editors utilize two major components for this process:
- Deep Learning: A form of machine learning where artificial neural networks (similar to the human brain) learn from vast datasets to recognize patterns and structures within images. In the context of removing masks, deep learning helps the AI identify the facial features and structure that should be visible once the mask is removed.
- Generative Adversarial Networks (GANs): GANs are systems made up of two neural networks that work against each other to generate realistic images. In AI photo manipulation, GANs are often used to predict what elements are hidden behind an object—in this case, a mask. The generative network creates new image content, while the adversarial network ensures that the generated image looks realistic.
These techniques allow AI tools to “guess” what the face might look like underneath the mask, and seamlessly integrate those details into the image, producing a realistic result.
Step-by-Step Guide to Remove a Face Mask from a Photo Using AI
Now that we understand the basics of AI photo manipulation, let’s explore the step-by-step process of removing a face mask from a photo. We’ll outline the general procedure, from selecting an AI tool to fine-tuning the result.
Step 1: Choose the Right AI Tool
The first step in removing a face mask is selecting the right AI-based software or online tool. Several AI tools are available, each with different strengths and weaknesses. Below are some popular AI tools you can use for this task:
1.1 Fotor
Fotor is an online photo editing platform that offers AI-powered tools to remove masks from images. The software is beginner-friendly and provides an intuitive interface, making it easy to get started with AI-based photo manipulation.
1.2 DeepAI
DeepAI offers an online AI image editor that can help with facial recognition and object removal. This tool is particularly useful for restoring parts of the image that may be hidden behind the mask.
1.3 Remove.bg
While Remove.bg is primarily used for background removal, it also has a feature that can help with removing masks from faces. Its AI algorithms can identify and recreate hidden facial features when a mask is removed.
1.4 FaceApp
FaceApp is an AI-based app that uses deep learning to manipulate facial features. Though it is best known for aging or gender-swapping effects, it can also help remove or alter facial masks, though it may not be as accurate as other AI solutions.
1.5 Photoshop with Neural Filters
Adobe Photoshop, long known for its photo manipulation tools, has incorporated AI-powered “Neural Filters” into its latest versions. This feature can be used to enhance or remove certain parts of an image, including face masks. While Photoshop requires a subscription, its powerful suite of AI tools makes it ideal for professionals.
Step 2: Upload the Image
Once you’ve selected an AI tool, the next step is to upload the image that contains the face mask you want to remove. Most AI tools accept common image formats such as JPG, PNG, or TIFF, but always check the file requirements for your chosen tool.
- Tip: If you’re working with a high-resolution image, ensure that the AI tool you’re using supports it. Some tools may experience slower processing times or reduced accuracy with larger files.
Step 3: Detect the Face and Mask
The AI algorithm will automatically analyze the image for faces and masks. It will typically detect the presence of the face mask based on various features, such as the shape and texture of the mask. If you are using a more advanced tool like Photoshop with Neural Filters, the software might require you to manually highlight the areas to be altered.
- Tip: If the mask is covering part of the subject’s face (e.g., the eyes or mouth), ensure that the AI tool has a clear view of the subject’s facial features before beginning the editing process.
Step 4: Remove the Face Mask
Once the AI detects the face and mask, it will generate a prediction of what the face should look like without the mask. This is achieved by analyzing surrounding facial data, such as the eyes, nose, and mouth, and then reconstructing the hidden portions of the face.
The tool might allow you to adjust various settings to fine-tune the result, including the facial structure, expression, or the visibility of particular features like hair, lips, or skin tone. With AI, these adjustments are typically intuitive and non-destructive, meaning you can experiment with different configurations until you achieve the desired result.
- Tip: If the mask is particularly large or intricate, the AI may struggle to produce a perfect result. In such cases, you may need to assist the AI by adjusting the boundaries of the mask area manually, or you can edit the image further using tools like clone-stamp or healing brushes.
Step 5: Review and Refine the Result
After the AI has completed its work, you should closely examine the image to ensure that the result looks natural. Look for common artifacts such as blurry facial features, unnatural lighting, or inconsistent textures. Some AI tools provide sliders that let you adjust the level of blending or add more details to the reconstructed face.
In some cases, you may want to touch up the image manually. AI tools typically do a good job of filling in gaps, but fine-tuning may be necessary to achieve a flawless look. You can use the following techniques:
- Blurring Tools: If the edges of the mask removal appear harsh or too defined, use a soft blur to blend the mask’s edges into the rest of the image.
- Color Correction: Ensure that the skin tones match the surrounding facial areas. Use AI-powered color correction or manually adjust the hues to make everything appear uniform.
- Texture Adjustment: In some cases, the skin texture under the mask may appear inconsistent. AI tools can sometimes generate this detail incorrectly. You may need to manually edit the texture using retouching tools or overlays.
Step 6: Save and Export
Once you’re satisfied with the result, the final step is to save and export your image. Most AI tools will offer options to export the image in a variety of formats, such as JPG, PNG, or TIFF.
- Tip: If you plan to share the image on social media or print it, make sure to export it at the appropriate resolution. High-quality images are crucial for professional use, while lower resolutions are sufficient for web or mobile viewing.
Step 7: Post-Editing for Final Adjustments
While AI tools make the process of removing a face mask from a photo much easier, it’s often beneficial to perform post-editing. Even the best AI tools can sometimes produce minor artifacts, so here are a few tips to ensure a polished final image:
- Sharpness: Increase the sharpness of the image to enhance the details of the facial features.
- Retouching: Apply subtle retouching to even out skin texture and remove any blemishes that may appear during the mask removal process.
- Filters: Apply filters for creative effects, or adjust the brightness and contrast to enhance the photo’s overall appearance.
Generate
Challenges and Considerations
While AI tools have made photo manipulation easier, removing a face mask is not always a flawless process. Here are some challenges and considerations:
- Accuracy: Depending on the quality of the image and the AI tool being used, the AI may not always generate an accurate representation of the face. The technology is still learning, and sometimes faces can appear distorted.
- Mask Complexity: Some masks, such as ones with intricate designs, may confuse the AI, leading to less accurate results. In these cases, manual intervention might be required.
- Ethical Considerations: It’s important to remember the ethical implications of using AI to manipulate images. Ensure that you have permission to edit the photo, especially if it involves the faces of other people. Additionally, be mindful of the potential for deception when sharing altered images publicly.
Conclusion
Removing a face mask from a photo using AI can be an incredibly useful tool for both personal and professional purposes. With the advancement of AI technology, photo editing has become more accessible, efficient, and realistic. By following the steps outlined in this guide, you can effectively remove face masks from your images and restore or enhance the facial features beneath them.
Whether you’re working with personal photos, creative projects, or professional images, AI provides powerful solutions for removing face masks and editing photos seamlessly. As AI tools continue to improve, we can expect even better results and faster processing times in the future. So, the next time you need to remove a face mask from a photo, consider utilizing the power of AI to get the job done quickly and efficiently!
For more information Click here….